So I wrote in the last entry that I would give away all my secrets to taking really good selfi... Portraits. And I will! Truth be told, there aren't that many secrets, but prepare for a long and somewhat technical entry.
I've wrote entries that tangent this portraiture deal before, specifically self-portraiture. (I know, it's super vain of me be taking so many selfies. But it simply feels like too much of a hassle to involve anyone else in my photography.)
Before we begin with the actual editing part, I want to make a reference at these older entries, because they're all about how to set up the lighting and camera, which in truth is a lot more important than editing. Without good source material to work with, you can just forget about it. You can polish a turd, but you know what they say (It's still shit.).
elaborate selfies Super DIY lighting.
DIY followup and a bit of not-feminism The importance of a narrow photographic field of view, or "the selfie-stick effect".
DIY camera shutter release On how you can move away from the camera without being a total pleb using a selfie-stick.
That should be enough reading to keep you occupied maybe forever.
Now that you've taken a picture you like, where you're not making an awkward face, and your smile looks natural, you can go ahead and start up whatever picture editing software you prefer. That'd be Photoshop, for most of you. If you use Lightroom or any other more advanced photography editing suite, then this guide isn't for you anyway. You probably know what you're doing. This is a guide to my lazy way of editing. As I always have, I'll use GIMP, a free, open-source image editing suite that mimics Photoshop in a lot of ways and does everything a little bit worse. I'm just too lazy to make the switch from GIMP to PS.
The tools we're going to need are 1. Curves, 2. Dodge/Burn tool, 3. Unsharp mask, 4. the Clone stamp tool, and 5. the Lasso tool.
Lets begin.
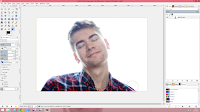
So what's wrong with this photo? The contrast is obviously off. Don't get me wrong, a narrow range of values is actually not a bad place to work ahead from. What follows is a bunch of screencaps from various stages in the editing process. The texts always apply to the image below the text.
I begin by modifying the brightness and contrast via the "Curves" tool. I prefer editing values as curves rather than using "Levels" or simply "Brightness/Contrast", because Curves gives you the greatest amount of control. Learn to use it. It enables you to increase the local contrast in a specific range of values (Midtones, or Brights, as examples.). It's all about reallocating contrasts within the picture. It's not super intuitive at first, but it's the best tool. Playing around with it is how I learned how to use it.
I used the Curves three times in a row. Because of how the tools works, it would be possible to make the same changes in one step, but splitting it into three steps makes it a lot easier.
At this stage, there isn't a whole lot of contrast in the picture. That's desirable at this point; A bright and low contrast range of values looks better in faces. But to even out the image and avoid a washed-out look, we'd ideally want to darken something else. I go ahead and use the Burn tool, set to Burn shadows with a low Exposure setting (Basically, this means the tool will aggressively darken the areas that are already dark, but leave the midtones and brights as they are.). I darkened the hair, eyelashes, and the eyebrows. Also a tad under the chin to visually pull it out and sharpen the jawline. This tool is nice because it doesn't really make a difference if you use a tablet pen or just a simple mouse, it works well anyway.
Next, I set the same tool to Dodge midtones. In English, that'd mean brighten the areas that aren't dark nor bright. I dab a bit of that under the eyes, and I also use it to even out the soft light coming from behind, smoothing the transition specifically on the sides of the forehead. I also switch back to the Burn tool to darken the sides of my neck a bit, because it nicely evened out the composition.

We have now achieved a balance between light and dark in the picture. What's next is I use the Clone tool to cover up a bit of my acne. This is the only invasive editing I do, and I think it's fine to cover up a few pimples. It's basically a lot like digital make-up. What the Clone tool does is it selectively copies a part of an image and moves it to where your brush is. In GIMP, it works by first setting the clone source with Ctrl+LMB, and the brushing away in the area where you want to copy to. To cover a pimple, set the clone source just above or beside the pimple, and then brush over the pimple. I'm sure you'll get the hang of it pretty quickly. I also used it to clean up the unibrow a bit.

Next up: Unsharp Mask. It's a pretty amateurish tool and there might be better alternatives in Photoshop, but as long as you keep it subtle it's fine. Sometimes, I use a high Radius combined with a low Intensity, because it evens out contrasts and brings everything out. It does not, however, sharpen. If you want to only sharpen the image, use a suitably low Radius setting.
To finish up, I Burned the hair a bit more, and applied another round of the Curves tool. The picture was a bit dull, and the Curves step, although subtle, added a lot of needed pop. I also Lasso'ed the shirt and used curves to make it brighter. The contrast between the shirt and my face was suspiciously high, as we always strive to a result that doesn't appear edited or tinkered with. (Apply a bit of "Feather" to the selection before using Curves. That way, the edge of the selection won't show up as clearly.)
And here we are. From hopelessly washed out to fabulous in a matter of minutes. This is how I edit the vast majority of pictures, and you rarely need more than the Curves and Dodge/Burn tools.
I think I look pretty bliss. If you're editing a photo of someone who's not blinking, you might also want to try Lassoing and Feathering up a selection around the eyes, and using Curves to add some contrast to darken and deepen the eyes. Think digital makeup. Make the eyes pop.